Category Archives: Technology

Setting Up TeamSpeak 3

Written by William Roush on October 11, 2016 at 6:28 pm

Remote Office Workers And Easy Communication

Under some circumstances workers that work from home or in different offices may want to stay continuously connected, with the same ease of access as you would have if you were working in a group around a table. Most VOIP systems used for telephony services can work, but setting up conferences can be annoying, and the always-on behavior and difficultly to “break out” from a group chat to chat privately can be annoying.

What Is TeamSpeak?

Why TeamSpeak and not Ventrilo/Skype/Mumble?

Ventrilo

Ventrilo is a VoIP solution commonly used for video games. The business model for ventrilo revolves around licensing for resellers, with only the 8 seat server being available for download. Additionally it’s old and doesn’t have the nicer security features of Mumble and TeamSpeak 3.

Skype

Skype It doesn’t provide the instant access and ability to “jump in” to rooms at any times, also the total control of the environment helps improve security.

Mumble

Mumble is an open source VoIP solution that has picked up a lot in the gaming community. Unlike Ventrilo it isn’t limited to the 8 seats or TeamSpeak which is limited to 512 for free servers. Mumble would be my second choice, however last time I used Mumble it wasn’t quite as polished in terms of ease to use and set up, otherwise it would be my first.

Additional Security Settings You’ll Enjoy

Security Tokens Vs. Passwords

Everyone’s identity has a private key that they use to identify themselves with. This private key removes the need for user account management with passwords on every server they connect to. This also allows the user to export their private key to their other devices and have their identities follow them around regardless of the device.

Setting Up Virtual Servers

Virtual servers allow you to have multiple TeamSpeak instances on a single TeamSpeak install. You’re still limited by your total license count (so if you have a 512 connection license, you can have 2×256 connection virtual servers, or however you want to divvy that up).

Setup and Install

We’re going to download TeamSpeak 3 and install it into /opt/teamspeak, get the latest download from the TeamSpeak 3 site.

root@teamspeak:/# cd /opt
root@teamspeak:/opt# wget http://dl.4players.de/ts/releases/3.0.10.1/teamspeak3-server_linux-amd64-3.0.10.1.tar.gz
root@teamspeak:/opt# tar xvf Teteamspeak3-server_linux-amd64-3.0.10.1.tar.gz
root@teamspeak:/opt# mv teamspeak3-server_linux-amd64 teamspeak

Now we’ll fire up TeamSpeak.

root@teamspeak:/opt/teamspeak# ./ts3server_startscript.sh start
Starting the TeamSpeak 3 server
TeamSpeak 3 server started, for details please view the log file
root@teamspeak:/opt/teamspeak#
------------------------------------------------------------------
                      I M P O R T A N T
------------------------------------------------------------------
               Server Query Admin Account created
         loginname= "serveradmin", password= "G1Cucbel"
------------------------------------------------------------------

------------------------------------------------------------------
                      I M P O R T A N T
------------------------------------------------------------------
      ServerAdmin privilege key created, please use it to gain
      serveradmin rights for your virtualserver. please
      also check the doc/privilegekey_guide.txt for details.

       token=dnYcuap7EllX2NcYo2R7QTJvkSWoF3ju178FDGx8
------------------------------------------------------------------

The serveradmin username/password and token you’re given are very important, save them, we’ll be using them later.

Logging Into TeamSpeak

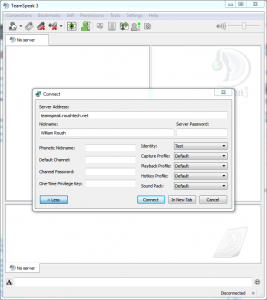
Fire up your TeamSpeak client, click “Connections” and select “Connect”, you’ll be presented with the connection window.

TeamSpeak - Connect

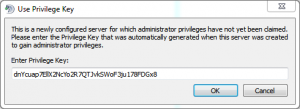
You’l want to take that token you had in the installation step and put it into the privilege window that pops up. If it doesn’t pop up select “Permissions” and “Use Privilege Key”. Entering this key will make you a server administrator for this virtual server instance.

TeamSpeak - Use Key

Virtual Server Configuration

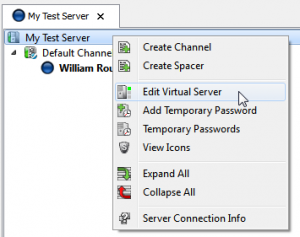
Next we’ll dive into the configuration of the virtual server, right click on the name of the server and select “Edit Virtual Server”.

TeamSpeak - Edit Server

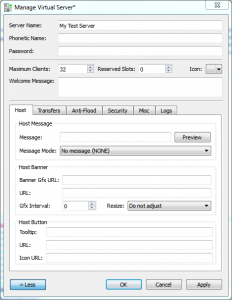
TeamSpeak - Server Config

Here you’re given options to change the server name, put limits, passwords, change security settings, and configure various messages the user will get upon logging on to your server.

Configuring Chat Rooms

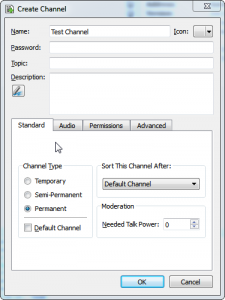
Right click on the server again and select “Create Channel”

TeamSpeak - Create Channel

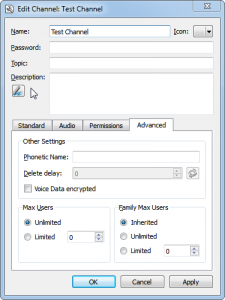
Here we can give a channel a name, topic, description and set it’s type (usually you’ll be setting this to “permanent”). The audio tab allows you to edit audio codec settings, you can configure the trade-off between sound quality and bandwidth requirements here. Changing codec settings can be useful for making a channel for which people on flaky cell phone connections can join in.
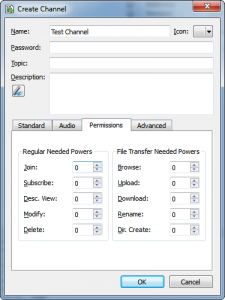
TeamSpeak - Create Channel - Permissions

TeamSpeak - Create Channel - Advanced

Backing Up Snapshots For VMware

Written by William Roush on April 17, 2016 at 8:01 pm

Sometimes backing up snapshots is useful, lots of applications don’t do it out of the box… so how are we going to accomplish this?

Why Backup Snapshots?

While everyone would jump on board the “snapshots aren’t backup” train (which I’m a proud member of) there are reasons you may want to backup snapshots. One of the biggest reasons I would is that certain tools like TeamCity can leverage snapshots as checkpoints to boot up your build agents from, and when you go to restore your virtual machines it would be nice to not have to recreate snapshots.

I’m sure there are many other perfectly valid reasons to need long-lived snapshots (especially on non-production development/testing machines), so why not support that recovery mode?

The Problem

As far as I’ve seen, all backup software squashes your snapshots, restoring a virtual machine results in you having a single state, all snapshots are erased. Ouch! We’ll need to get clever.

Doing It With Veeam

This isn’t the best way to do this, but so far it seems to be the easiest. File copy jobs. We want the entire state of the virtual machine, all of it’s files, it’s snapshot descriptor files, everything. Now there are a few downsides to this:

  • Your backups will be larger – Veeam only backs up the current state, we will be backing up all states. You need to store all the snapshot deltas and any memory snapshots.
  • File lock issues – We’ll need to resolve issues with backing up a powered-on virtual machine
  • Storage – We don’t get clean vbk files, we’ll have full copies of whatever exists on the datastore
  • Versioning – If we want to keep multiple copies over time, we’ll probably want to automate versioning our backup folders folders.
  • Tape – We lose some visibility pushing backup files to tape instead of the vbks (though this only applies to higher licensing tiers that can leverage that).

Doing it With Powered Off Virtual Machines

Easy enough, we want to pick the folder that the virtual machine is in on the datastore, and back it up. Everything should go smoothly and file locks shouldn’t bite us.

Doing it With Powered On Virtual Machines

This becomes extremely tricky, you need to back up only the unlocked files, this also means that the current state will be trashed (if this isn’t OK, we can automate a NEW snap prior to the job running and commit it on completion). Here are a list of what I’m backing up to test this:

  • [VM]-000001.vmdk – Our VMDK for our current state (this is bad due to locked file)
  • [VM]-aux.xml
  • [VM].vmx – Virtual machine configuration file
  • [VM]-ctk.vmdk
  • [VM]-Snapshot15.vmsn
  • [VM]-000001-ctk.vmdk
  • [VM].vmdk – Our base VMDK metadata, our snapshot
  • [VM].vmsd
  • [VM].nvram
  • [VM]-flat.vmdk – Our base VMDK with our data on it, our snapshot

These files were locked:

  • [VM]-000001-delta.vmdk – Our delta file for our current state (after our snap)
  • [VM]*.lck – Anything with a “lck” extension appeared locked.

When restoring the file we’ll create an invalid delta file to put things into a somewhat OK state, SSH into you hypervisor, navigate to your virtual machine’s directory and type this (replace “00001” with the number of the delta you’re missing):


touch  [VM]-000001-delta.vmdk

This will create an empty VMDK delta file, it’s invalid and your machine will not boot, but from this stage you can revert back to the last snapshot, setting everything in a correct state.

The easiest way to do this would be just to add all files to the file copy job, and let those that are locked fail, a script will handle this best being as Veeam’s UI will not let you multi-select files, and selecting the folder results in a failure of the entire backup on the first locked file.

You miss out on a lot of nice to haves, restoring this involves copying the files back to the datastore (can be done with a file copy job in the reverse direction) and adding the machine to your inventory manually, but you cannot restore to a newly named virtual machine, you’ll have to restore as-is and rename after it’s done. Be aware too: transfer speeds seemed to suffer a lot for this kind of backup setup.

Additionally this has worked under lab conditions, so please, as with any backup test it first! Let me know if it works for you.


If there is enough interest maybe I’ll write up some PowerShell scripts to automate some of the more tricky stuff and post it.

Exchange IMAP Over SSL Not Working

Written by William Roush on April 13, 2016 at 2:52 pm

Getting any of the following messages?


openssl s_client -connect [server]:993 -crlf
CONNECTED(00000003)
62604:error:140790E5:SSL routines:SSL23_WRITE:ssl handshake failure:/SourceCache/OpenSSL098/OpenSSL098-52.40.1/src/ssl/s23_lib.c:185:


openssl s_client -connect [server:993 -crlf
CONNECTED(00000003)
write:errno=54

While attempting to fix IMAP login issues for JIRA’s service desk e-mail to ticket integration, I came across this on my Exchange server:


Get-ServerComponentState -Identity [servername]

Server Component State
------ --------- -----
...
[Servername].domain.local ImapProxy Inactive
...

Solution was simple: enable the ImapProxy:


Set-ServerComponentState -Identity [servername] -Component ImapProxy -Requester HealthApi -State Active

Unable to revert snapshot: “the vendor of the processors in this machine is not the same”

Written by William Roush on April 6, 2016 at 5:24 pm

Warning: This is not supported by VMware, not recommended and I am not responsible for any data loss related to trying this. Snapshots are not backups and you should not rely completely on them. If you’re willing to risk data loss this may however save you… Have backups of the VM’s current state before attempting to do any of this.

On this Serverfault post a user is confused due to EVC configuration. For most people EVC only has to do with clusters and vMotion, however if you snapshot a running VM the VM’s CPU feature flags are set depending on the EVC settings of the VM. So a cold migration may leave you unable to revert the snapshot with the following error:

feature requirements of this virtual machine exceed capabilities of this host’s current evc mode

the vendor of the processors in this machine is not the same

We’re going to go ahead and try to take a live VM snapshot and convince VMware it’s a powered off snap. Sadly in my lab I do not have an EVC enabled cluster up with differing hardware so we’re going to take the best swing we can at it. We’re going to start with a powered on Windows VM, snapshot it while it’s powered on and attempt to remove all traces that the snapshot was taken while it was powered on so hopefully those sticky EVC settings won’t stick.


So we’re going to try to trick VMware into thinking the VM was powered off when the snap happened. There are 3 major differences in these files:

  • SnapshotTest.vmsd – A ‘snapshot0.type = “1”‘ line that denotes it’s a powered on snapshot
  • SnapshotTest-Snapshot1.vmsn – Additional binary data in the snapshot config file, may be related to state, likely has CPU flags in here somewhere
  • SnapshotTest-Snapshot1.vmem – The dump of the RAM onto disk.

The easiest way to attempt to do this is to open up the .vmsd file and remove the type line, and remove and re-add the VM to your inventory, this will trick the hypervisor into thinking the snapshot was powered off and won’t load the vmem file.

However I cannot test CPU flags mismatching in my lab, it’s entirely possible that the vmsn file will still conflict, which would require you to do some file surgery with a powered-off snap file as you base file (very risky).

Deleting the snaps will remove the vmem file even if the vmsd file has been updated to declare the VM as “powered off” during the snap, so cleanup should be easy (always check though, we’re doing funny stuff to VMware).